
IsDone.dll Error in Windows 10 is mainly related to installing PC games like GTA Vice City Download and large-scale programs.
There is compressed data in big games or programs, which is unexpected in your hard drive during the installation.

It also accounts for your PC's RAM along with the hard drive. During the installation, if your PC does not have enough memory to handle the RAM or hard disk process, then your PC can be affected by this Error.
The error message that usually connects with the isDone.dll Error is
- Unarc.dll returned an error code: -1
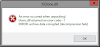
- An error occurred unexpectedly!
- Error: Collection data corrupted (decimation fails)
In addition to memory issues, the problem is contaminated DLL files, corrupted system files, hard drives with errors, antivirus problems, etc. The problem can occur when your PC game or software may not correspond.
So, without wasting time, let's see a few simple methods that can help you fix the isDone.dll Error on your PC. if you are facing IsArcExtract Error in windows 10,8,7 then read this full guide.
Also read: Who hacked Your phone
1. Check Hard Disk For isDone.dll Error
Step 1. Right-click a start button and then select Command Prompt option (Administrator) from the list menu.
Step 2. At the Advanced Command Prompt, type chkdsk C: /f command and press Enter.

Now, this tool will automatically scan and fix all the hard drive errors. After that, you can install the game and check that the isDone.dll error codex has been fixed.
You can easily use the check file system feature of the Minitool Partition Wizard Free Edition to check logical errors on your hard drive and fix them.
2. Download Game In Safe Mode
In Windows Safe mode, your computer only runs with the necessary system programs and services. By turning on windows in safe mode, you can save more RAM space and reduce third-party programs' potential conflict while installing the game or app.
Therefore, installing games in safe mode can resolve the Error due to insufficient RAM.
Step 1. Press the Win + + R key to open the run box, type the Msconfig to open the System Configuration window, and press ENTER.
Step 2. The second step is in the new window; go to the Boot tab and select the Safe Boot checkbox.

Step 3. Click OK and apply the button to save the button one by one.


0 Comments